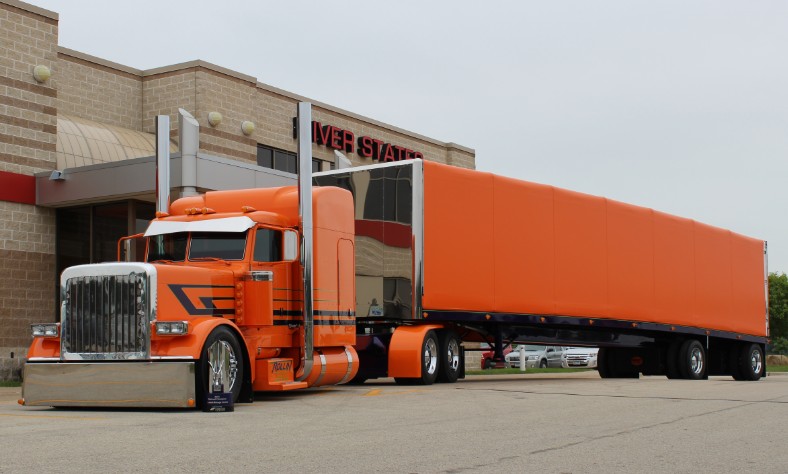
This custom big rig is one of Vinnie Diorio’s — a fellow whose won many custom truck awards over the years. It’s a 2013 Peterbilt 389 in front of a Mac curtainside trailer. The name of this truck is “trend settin’.”
Rollin’ Transport is the name of Diorio’s company. The media comes to us all by way of James Jaillet over at Overdrive Online, who tells us all that Diorio has won more Pride & Polish awards in the 25 years the competition has been held than almost anybody. And Diorio’s wins have included big ones like the “Trucker’s Choice” — the award voted on by regular joes rather than judges.
Featured music of the day:
To subscribe to this musician, click the red button:
Diorio has a small fleet of trucks in Wisconsin at Rollin’. He has won a lot of Best of Shows and two National Championships (2013 and 2014).
Recently, his 1985 Two-Tone Turquoise Peterbilt 359 with Kiegan Nelson took a Best of Show award earlier this year.
This orange Pete custom also won a bunch of awards over the last two years, including the River States Customz 2014, 75 Chrome Shop 2014, Fitzgerald (2013) and the 2013 for the 75 Chrome Shop as well.
Diorio’s “Picture Me Rollin” black and orange 2005 Peterbilt 379 with MAC trailer limited milage combo won the 75 Chrome Shop in 2011, too.
To read more about Diorio’s trucks, click here. Also, visit Overdrive Online (click here). A bunch of work on this custom tractor trailer was also done by Fat Flynn’s Auto Trim (click here).
This 2007 Peterbilt 379 belongs to one Les Hackens, who is staff over at Overdrive Magazine. They posted up this truck, hopefully as a prelude to telling us all more about it. As for now this big blue Pete with a good size sleeper on it only has a few details known:
It’s used by Hackens to transport military and oversize equipment around the United States.
Hackens is out of Hanska, Minnesota, so if you’re around those parts you might see this truck and let us know a little about it.
Hackens has plans for the customization of his C-15 Cat-powered big rig with its 18-speed transmission: he intends to lengthen the frame out to a 300-inch wheelbase. He also plans to add graphics to the unit.
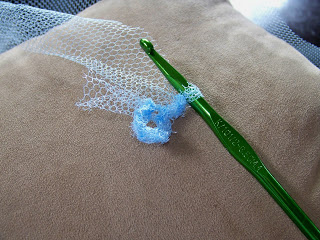
These crochet scrubbies are the reason crafter Cody over at Simply Home Made learned crochet! Morning sickness distraction was also a reason, she said. Well, how about this DIY crochet project? All you need is some nylon netting and a crochet hook.
The procedure for these crochet cleaning products are pieces of nylon netting, as I said. You cut the netting into strips about 1 1/2 inches to 2 inches wide and pretty long. If you’re using thinner or thicker nylon netting, you may want to cut thinner or thicker strips to work with. Thinner strips will result in stiffer scrubbies. Once you’ve cut a bunch of strips of nylon net, you put it all in a bag.
Although you can see an l hook in the photo, Cody usually uses a K hook for the project.
Stitches used: double crochet
Conceptual overview of this crochet craft:
Start out by joining a circle and chain it and join it. Do four rounds like this, making sure the knots are facing you — the right side will be the scrubby’s inside. The front side will be done and you’ll be onto the backside, crocheting a decreasing pattern. Stuff the scrubby to make it fuller. After you have closed it up and stuff any leftovers into the hole.
For more detailed information on this crochet project, check out Cody at the Simply Homemade Blog (click here).
This is how you tie the fork bows being popularized by crafter Eskimimi Lakes. She’s coming up with all kinds of interesting crafting ideas.
The image for how she ties them is pretty self-explanatory, but if you have trouble, there are more directions (explanations of the images) over at her site.
Make sure to check out Eskimimi Lakes sometime anyway. A crafter who has caught our attention!
Basket Weave Mitts (Free Pattern)
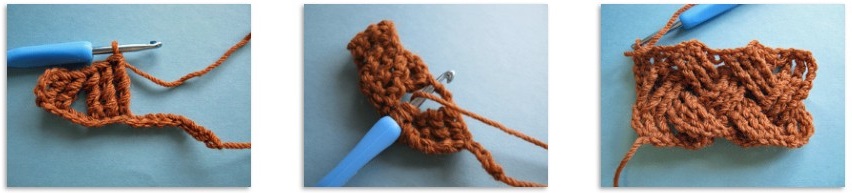
How about this crochet pattern for fingerless gloves? Here’s a stitch pattern that creates a basket weave look on one side and a ridged look on another. The RS side looks basket and the WS looks ridged. These crochet mitts are very popular with a lot of crocheters, and we wanted to find some good crochet patterns for them. Our starting point was these green basket weave ones in the picture above. Just the right amount of puffy softness, interesting but very clean and regular patterning and texture, and room for individual customization — any colors you want, and you could modify the length when you crochet them.
Those green ones up top were featured on the Interweave Store. They are the work of the crocheting hands of Laurinda Reddig. This pattern is available for $3.85 for the gloves pattern right from the original publication or $15.00 for the whole ebook. The link for this is at the bottom.
There’s also a free option. It’s by crafter Sarah Reed on the Crochet Me blog on Bloglovin’. Basket weaves are already a pattern that create an interesting appeal for the eyes, whatever you put them on. Laurinda Reddit used these basket weaves and made her gloves. Then Sarah Reed used that and adapted it to make her gloves. Are you the next crocheter to make something and pass it on to the crochet community?
What you’ll need:
Yarn (Laurinda recommended 5 ply (12 wpi) sport yarn weight) around 328 yards (300 m)
Hook (3.75 mm recommended)
This will make mitts 7.5 or 8.5 inches long and 8.5 or 9.5 inches around. Fabric will stretch to fit.
(Click to expand images)
Conceptual overview of the crochet project:
This crochet is a bit tricky, but one works the pattern by skipping 3 stitches on the RS rows and working post stitches in 3’s. Also, you’d work in front of the stitches you’ve already made. Then you work post stitches around the stitches you skipped. The WS rows are worked back post stitches and behind stitches. Some of the difficulty comes from having to find the post stitches in amongst the other stitches.
When all the rows have been crocheted, you seam up the side of the glove, leaving a space for the thumb (an opening in the seam).
For details about the pattern, visit Interweave Store for the $3.85 pattern (click here) or visit Crochet me for the free version (click here).
The NeverEnding Wildflower (Free Pattern)
With this free endless flower crochet pattern, you can make a flower as big or small as you want. You could make it tiny enough to decorate a tea kettle (or even a tea cup) cosie, or you could make it expand until it was the size of a giant round blanket or throw rug. The possibilities are endless with this crochet pattern.
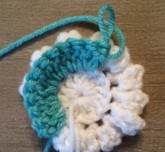
How this pattern started out was the crafter / crocheter Rebecca (over at Little Monkey Crochet) because she wanted to find a way to make a “giant flower” and this is what she came up with. The real interesting bit for this pattern is that the petals don’t just pile on top of each other (which can also be an interesting look), because between each round of them there’s a round of increases. Nice one, Rebecca! This free flower crochet pattern stays the same height when it’s layed down.
You will need: H (5mm) hook (unless you prefer a different size because you’re using larger / smaller yarn), any yarn (the picture at the top, as you can tell looking at it, uses worsted weight — that flower picture is one that’s 8 inches across.
Conceptual overview of the crochet project (rated “easy”):
You will start out by making the first round with double crochet and a slip stitch. Then you’ll make the first round of petals around this wheel. When you make your petals, you were ignoring another loop available there, and now you’re going to use that ignored loop: you work around Round 1 again (with another color, generally, to make it easier to tell the parts apart while working). Continue to add rounds to the wheel, then, when it’s big enough, fasten off and weave in the ends.
To get more details on this free crochet pattern, which can be used for afghans, throw pillows or just about anything else crocheted, visit Little Monkeys Crochet (click here).
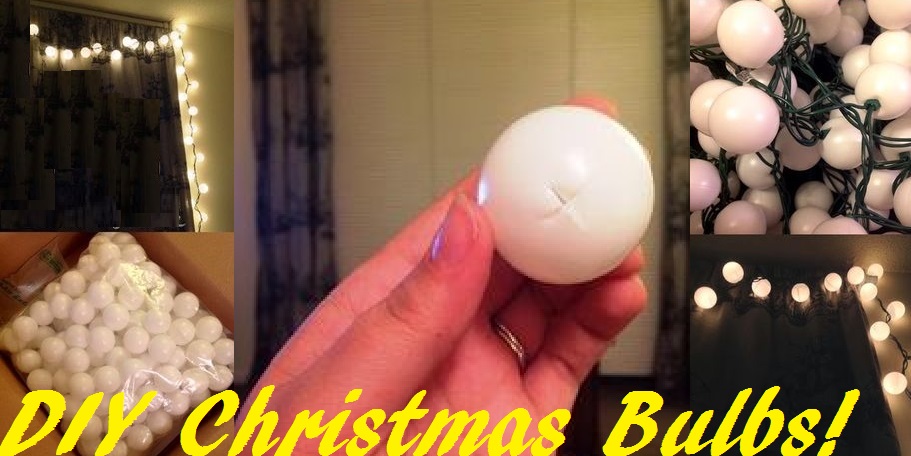
This little idea is pretty clever and useful. If you would like to have big round white low-brightness lights strung up around your decor at Christmas, this might be the thing for you.
You simply take your regular string of Christmas lights and some ping pong balls. Use a knife to score the holes — be very careful with the knife. You should always wear cut-proof gloves.
Cut a small “x” into the ping pong balls, and pop them over the bulbs.
Basket Weave Mitts (Free Pattern)
How about this crochet pattern for fingerless gloves? Here’s a stitch pattern that creates a basket weave look on one side and a ridged look on another. The RS side looks basket and the WS looks ridged. These crochet mitts are very popular with a lot of crocheters, and we wanted to find some good crochet patterns for them. Our starting point was these green basket weave ones in the picture above. Just the right amount of puffy softness, interesting but very clean and regular patterning and texture, and room for individual customization — any colors you want, and you could modify the length when you crochet them.
Those green ones up top were featured on the Interweave Store. They are the work of the crocheting hands of Laurinda Reddig. This pattern is available for $3.85 for the gloves pattern right from the original publication or $15.00 for the whole ebook. The link for this is at the bottom.
There’s also a free option. It’s by crafter Sarah Reed on the Crochet Me blog on Bloglovin’. Basket weaves are already a pattern that create an interesting appeal for the eyes, whatever you put them on. Laurinda Reddit used these basket weaves and made her gloves. Then Sarah Reed used that and adapted it to make her gloves. Are you the next crocheter to make something and pass it on to the crochet community?
What you’ll need:
Yarn (Laurinda recommended 5 ply (12 wpi) sport yarn weight) around 328 yards (300 m)
Hook (3.75 mm recommended)
This will make mitts 7.5 or 8.5 inches long and 8.5 or 9.5 inches around. Fabric will stretch to fit.
(Click to expand images)
Conceptual overview of the crochet project:
This crochet is a bit tricky, but one works the pattern by skipping 3 stitches on the RS rows and working post stitches in 3’s. Also, you’d work in front of the stitches you’ve already made. Then you work post stitches around the stitches you skipped. The WS rows are worked back post stitches and behind stitches. Some of the difficulty comes from having to find the post stitches in amongst the other stitches.
When all the rows have been crocheted, you seam up the side of the glove, leaving a space for the thumb (an opening in the seam).
For details about the pattern, visit Interweave Store for the $3.85 pattern (click here) or visit Crochet me for the free version (click here).
The NeverEnding Wildflower (Free Pattern)
With this free endless flower crochet pattern, you can make a flower as big or small as you want. You could make it tiny enough to decorate a tea kettle (or even a tea cup) cosie, or you could make it expand until it was the size of a giant round blanket or throw rug. The possibilities are endless with this crochet pattern.
How this pattern started out was the crafter / crocheter Rebecca (over at Little Monkey Crochet) because she wanted to find a way to make a “giant flower” and this is what she came up with. The real interesting bit for this pattern is that the petals don’t just pile on top of each other (which can also be an interesting look), because between each round of them there’s a round of increases. Nice one, Rebecca! This free flower crochet pattern stays the same height when it’s layed down.
You will need: H (5mm) hook (unless you prefer a different size because you’re using larger / smaller yarn), any yarn (the picture at the top, as you can tell looking at it, uses worsted weight — that flower picture is one that’s 8 inches across.
Conceptual overview of the crochet project (rated “easy”):
You will start out by making the first round with double crochet and a slip stitch. Then you’ll make the first round of petals around this wheel. When you make your petals, you were ignoring another loop available there, and now you’re going to use that ignored loop: you work around Round 1 again (with another color, generally, to make it easier to tell the parts apart while working). Continue to add rounds to the wheel, then, when it’s big enough, fasten off and weave in the ends.
To get more details on this free crochet pattern, which can be used for afghans, throw pillows or just about anything else crocheted, visit Little Monkeys Crochet (click here).
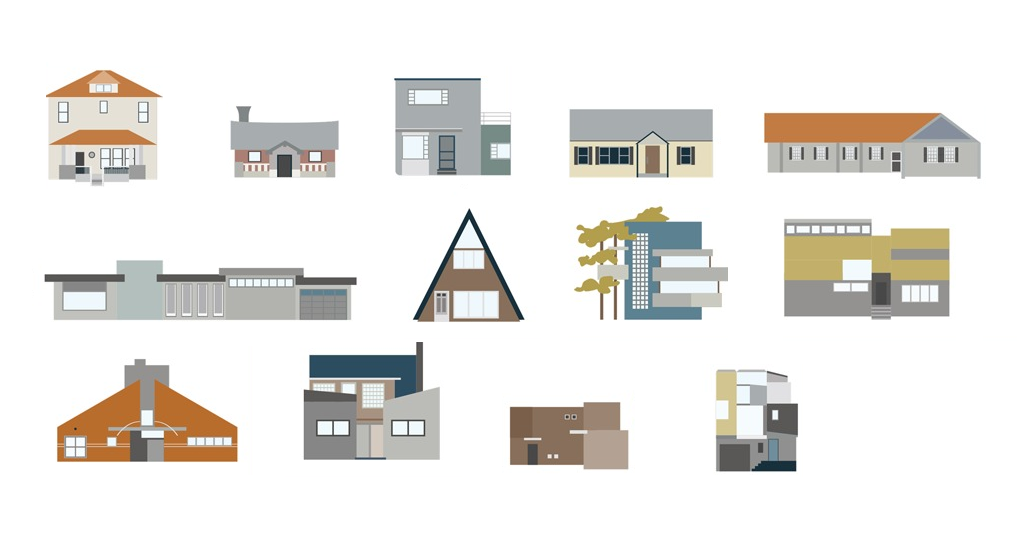
The last century amazed us and kept us interested in architectural styles as architects invented new style after new style at a rate unprecedented in history. The trend towards new building styles is continuing in this century with firms such as Neumann/Smith Architecture advancing the modern period of architecture. The modern period in architecture began roughly around 1900 and continues still.
A note about the architecture images here: they come from a survey of American architectural styles done by Pop Chart Lab, available to order for around $30.00 before shipping.
The survey was for houses in America between the 17th Century postmedieval English dwellings that some of the first Americans built to the new “McMansions” that have been built since the 1990s. An interesting reference work for the architecture student or those interested in studying architecture or perhaps American history.
So, on to the architectural styles test. Make sure you look at the image again and see how many you can identify on your own before proceeding to the answers:
Prairie (American foursquare) [1900-1920]
Craftsman (side-gabled roof) [1905-1950]
Art Moderne [1920-1940]
Minimal traditional (Cape Cod) [1935-1950]
Ranch (cross-gabled roof) [1955-1975]
Contemporary (flat roof) [1945-1990]
A-frame [1950-1975]
Organic [1950-present]
Shed [1965-1990]
Postmodern [1965-present]
Deconstructivist [1980-present]
21st Century (material based) [1990-present]
21st Century (loosened shape) [1990-present]
How did you do on the architecture quiz? Are you as much of a architecture styles expert as you thought, or did you maybe learn a thing or two? For the Pop Art poster, click here.
Download XAMPP for your operating system (mine on one computer is Windows 8.1 64-bit, on another Windows 7, etc.) Windows XAMPP download link. If you need Linux or something else, search “XAMPP ____ download.”
Run the program. Just leave all the install options checked so they all install (you don’t need them all, but to keep it simple). I installed all mine.
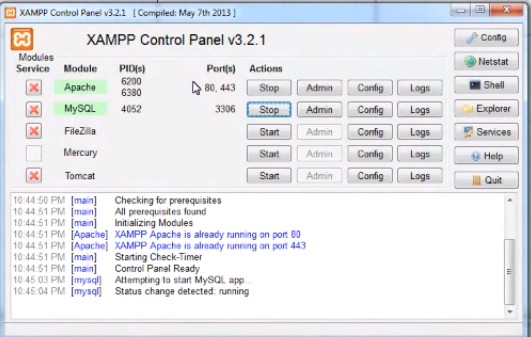
Run the program once it’s installed.
You may see an error if you have Skype running. This is because Skype and XAMPP use the same “port.” Sign out of Skype. Then click “start” on “Apache” and it should display, “Attempting to start Apache app…
… Status change detected: running.” (If it doesn’t, you have a problem, and you’re going to have to web search out your problem. I won’t be covering that here.) Then click “start” on MySQL” and it should run. You now are running — you have everything you need.
Image by Craig Chamberlin
To check it, go to your “browser” (Chrome, Firefox, Safari, Explorer or other) and type in “localhost” in the address bar. It should display XAMPP. This means you have sent a request with your browser to look back into your computer and bring up a webpage stored on your computer.
PART II: continue by testing database (mySQL), scripting language
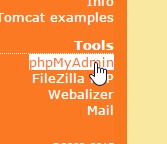
Select your language and click “phpMyAdmin.”
If you get a screen, it is working.
Go back one screen to the XAMPP interface and click “phpinfo().” If you get a screen, it is working.
PART III: download installer application
Go back one screen again to the XAMPP interface and select WordPress or any installer you want to use.
PART IV: Use XAMPP to work on code for a WordPress site
Click “phpMyAdmin”
Click “Databases”
Type in “WordPress1” in the “Database name” field and click “Create.”
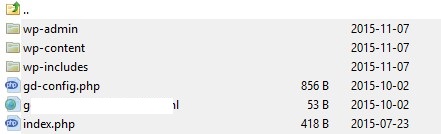
Open “htdocs” (search your computer for “htdocs”) and create a folder called “wordpress1.”
You are a “client.” You want to see a website, and you want to see a website that displays the way you want. You’ll also want it to load pretty quickly. That’s why it’s a good idea to check out someone who can get you the cheapest (and quickest) deals for broadband such as Usave, if waiting for your computer to load annoys you then comparing broadband deals will certainly help you get that quick internet. As well as having a fast broadband service, for any website, it is essential to look into finding the right host. For example, if you have a WordPress site, it may benefit you to research wordpress hosting to help find the best provider for your site. If you wish to find a good hosting service provider you might be interested in something like HostiServer among others that might be good fit for your website.
What happens is you (the “client”), using your computer, send a “request” through the internet to another computer (a “server”). This other computer (a “server”) is where the webpage you want is stored (just like you have text and picture documents on your own computer, which other computers could access through the internet if you allowed them to).
You send your first request, commonly, through a “browser” which is a program that is installed on your “device” (computer, phone or other). For example, the Chrome browser usually opens with an automatic request to Google’s server for the Google homepage. This homepage shows up in your browser. The homepage contains a “search box.” When you type something in, like “The Speaker,” Google’s “search engine” is used to find webpages that are relevant to your search term. (The search engine has already spent a lot of time finding and indexing websites based on the content it has read on their pages, so it relies on it’s own existing index to find and display relevant “results.” It also “ranks” these results based on its own ranking formula to show you what it thinks is most relevant first. What it shows you is “hyperlinks,” or, colloquially, “links.” When you click on a link, the browser sends a request through the internet to the server where the webpage lives. The server answers the request by sending the information — which is sent as a bunch of code. The browser can read this code and obeys its commands to display a webpage as an organized collection of pictures and words.
If all there was to get from the server was a single rendition (appearance) of the webpage you wanted, it would send that to you.
But since it’s not 1993, the server is connected to “databases” where more information is stored, and relationships between this information is stored, too. Much database information is like this:
Number
Date
Title
Author
1231
Jan. 1, 2015
China’s Human Rights Violations
Tenzen Xi
1232
Jan 2, 2015
Korea Wants Reunification
Kim Dae-jung
1233
Jan 4, 2015
Canada’s Immigration Problem
Stephen Trudeau
1234
Feb 5 2015
American Help Requested
Mohammad Franklin
So the client can ask the server for the earliest article or for all articles in January, or for all articles by Tenzen Xi, or for all articles that contain the word “human rights.”
Image by Craig Chamberlin
Similarly, databases can hold information for page display options. 1,000 people make requests to a server for a webpage, but they can all see a different display of that webpage because they have set their settings to display it a certain way. For example, if the webpage has color options, relevant information display options, etc. Some webpages offer a display without images. Some will check your browser to see if it has java and will send a different version if you don’t.
How the server sends for information from the database is a language (called a “scripting language”). This language speaks in computer and says, basically, “find this table, this row, also this row, then display the two rows I asked for.” It sends this language right to your browser, which interprets it (as described above).
 " >
" >