
Boxy Bear (Free Pattern)

Having the knowledge that I am a crocheter, my friends will often send me free crochet patterns for cute little hats, a nice shawl or an afghan with some complicated crochet stitch. I usually look at the picture, see if it’s something I can figure out by winging it and then will either attempt it or send the crochet pattern to the recycling bin. However truth be told it’s because I am intimidated by the pattern, I have never learned how to properly read a crochet pattern, let alone execute it out of yarn and have it look anything like the picture and that’s because crochet patterns can be confusing.
The crochet patterns I am used to seeing are the ones that my grandma or my aunt would use to make complicated textiles, these crochet patterns seemed to be just a series of numbers and letters and I felt like someone is trying to decipher Morse code. Recently however I had a crochet pattern come across my desktop that was worth spending a little extra time on. It’s the Boxy Bear by Erica Dietz.
Boxy Bear is one of 3 free woodland critter crochet patterns she offers through Fairfield world site and I have to say it was this Boxy Bear’s cute little face and simple shape that made me take a second look, when I looked at the crochet pattern at first, it looked like a foreign language with english mixed in and then I started to realize all those numbers and letters are crochet stitches for example ch1 is chain 1 or the number following and 7sc is single crochet meaning the hook goes into the chain, yarn over, pull the yarn through the chain, yarn over again, pull through itself to finish the stitch, and the seven tells me to do this crochet stitch 7 times, and because this crochet pattern works the stitches “in the round” meaning you crochet your stitches around and around, there is less worry about turning the project to start and new row and ending up putting an arm or a leg in the wrong spot…the light bulb just came on, it actually seems pretty simple if you have the basics down because Erica Dietz has made this crochet pattern less confusing by telling you how many stitches you should have in each round and she uses plain English. For this Boxy Bear crochet pattern you only need to know the basic stitches and have some knowledge of joining and simple hand sewing.
The tools you will need for this crochet project are:
- Worsted weight yarn in your colours of choice, a regular size ball for the main parts and a small amount of a lighter colour for the muzzle
- Size G crochet hook (size 6 or 4.00mm)
- 2- 15mm safety eyes or buttons
- 21 mm safety nose or a button (it depends on the age of the person receiving it, if the recipient is old enough to not have to worry about choking hazards, I think a button would suffice)
- 5×7 scrap of fabric (for the weighted pouch in the bottom to help the bear sit up)
- Yarn needle
- Scissors
- Threaded sewing machine or needle and thread (to sew the pouch)
- Fiber fill for stuffing
- Weighted stuffing beads (I use the plastic floral beads from the dollar store, they are similar to that used in beanie babies)
Expansion ideas for this project are: a messenger bag- no stuffing or weighted pouch and by extending the back side of the top to become the flap and then adding the facial features to the over flap and adding a strap, still all using basic crochet stitches and skills
Making the project big enough to be a snuggle pillow instead of just a small stuffed animal, there are many possibilities with this pattern and that of the other two critters.
“Happy Hooking” fellow friends. You can find the full instructions here (Link).
This Custom Gold and Brown Cabover With A Pretty Long Sleeper

Cabover. Used everywhere, and a big part of the reason for them is they’re shorter, ie length restrictions.
Cabovers can be extended like you see here. You can get extra sleeper room.
UPDATE: A bunch of truckers and truck drivers commented on this custom classic truck and here’s what they said (click here).
The truck pictured here belonged to ATDS, a company that was a driving school or something, reportedly. This was their showpiece.
Besides this one, they had a matching Marmon conventional. The Marmon also had a giant sleeper and paint that was like this one’s. Shelby Elliot, used to have pictures of the Marmon and this one both on his site. Elliot, it is reported, always traded in American trucks that were unique.
Kenworth cabovers are considered by many people to be living legends. Even people who don’t generally like cabovers like these ones when they’re done up nice (not everyone, but many). The most popular models are the K100, K123 and K200. These still run on the highways. They’re a sight many enjoy spotting.
In the custom trucking scene, big rig collectors and enthusiasts like to do full restorations on these.
You can find these trucks at most truck shows.
They’re rare though. They weren’t as popular as conventionals.
You can get used Kenworth Cabovers (not a long one like this, but with a sleeper) for US $20,000 and up.
Older ones (like from the 70s) can be much cheaper, and new ones (from this decade) can be around $50,000 or so. These are basic starting prices, though, and to get bigger sleepers and other upgrade-type features, add thousands.
Giant Semi Sleeper
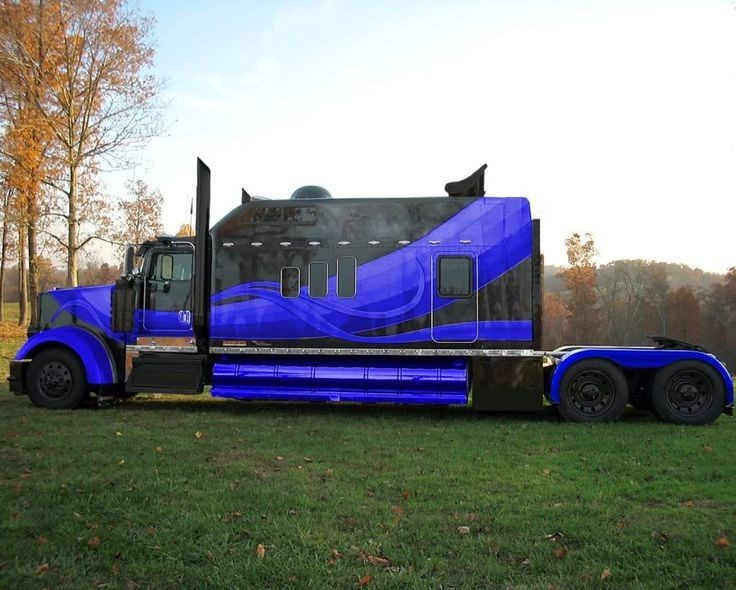
Since posting this truck originally, a lot of truckers and truck enthusiasts have commented on it. A lot of people are very impressed with this giant sleeper semi tractor.
One thing to note, though, although at first we thought this truck was the one called “Show Time” because it looks very similar, and many people thought it was just 2 different but similar paint jobs, according to Chuck Burkett, who says he is in the UK where this truck is, there are 2 trucks. This blue one and “Show Time.” According to Chuck, this blue sleeper semi was built by the owner of a Michigan-based company. Thanks Chuck!
A lot of people commented to say two things about that big custom semi sleeper unit: one was complimenting the look of this truck (which you probably noticed in the picture above), and the other was commenting on that it might not be ideal for work, or that the owner might not also be working the truck.
Backing it up was a big comment from active owner-operators and other truckers. Especially when it comes to tight spaces.
This was summed up nicely by James Coleman: “You need 5 lanes just too make a right hand turn in that. Let alone drag a trailer around.”
For the original write up on this big sleeper conversion custom semi truck, which has details about “Show Time” (we’re going to have to find some good details on this blue custom sleeper semi truck, so if you have them, let us know), click here.
Original Big Rig Motorhome

This big RV home on wheels is the Peterbilt I’ve seen several people refer to as “the original Kingsley Coach. We all know Kingsley luxury RV semi coaches, right? We’ve featured a few of them in our write-ups here.
This one has the lowest serial number on it. “Original Kingsley Coach serial #1001.” It was built by hand for the founder of Kingsley Coach. It’s a 1990 Peterbilt 379 tractor joined to a 1985 Provest XL motorcoach. I think the idea here the guy had was power and luxury at the highest retail level available.
The luxury big rig RV has a 400 big cam Cummins engine in it and a 5-speed Allison HT 754 transmission (automatic).
This first number is the only Kingsley Coach ever done with a Provest coach.
Features of this big luxury motorhome (or at least recently when it came up for sale about a year ago in Merritt Island, Florida):
2-100 gallon fuel tanks
aproximately 150 gallon fresh water tank
new 5000 watt power inverter
new batteries
2 central a/c units
one roof top a/c unit
3 heaters
2 flat screen TVs with built in DVD players
Interior recently upgraded
no propane
The milage was 84,998. Not sure what the price was. It’s no longer listed on the sales page if it ever was. Update — found the price: $99,900. Too bad about the annoying “SOLD” signs in the photos. We updated this write up on the Kingsley motor coach here (click here).

Giant Sleeper Kenworth

The W900 with its traditional long hood style is a classic according to many truckers and big rig lovers, and anything with a sleeper this big and a custom paint job will be sure to get a lot of attention — even more than big trucks already get.
The W900s are well-made and are solid trucks to have. When you buy them from Kenworth, you buy them to your own specs, so they’re all different, as most trucks are. They’ve also been popular with big rig custom projects, like this one.
This one has a giant sleeper on it. More like a room than what most truckers think of as a sleeper. It could easily serve as an RV vehicle. Some truckers and trucker couples / families use sleepers this big and bigger to enable them to live together as they transport goods across the country, despite the reduced load capacity this much size and weight amounts to.
Anyone who knows the name of this giant sleeper Kenworth or something more about it, let us know and we’ll update this article as we have done when you’ve commented on trucks in the past. (Update: Lisa Bowman Ringelstetter who owns the truck contacted us to say it was hers. Thanks, Lisa! Link to her webpage at the bottom.)
The W900 is still produced and sells well from what I understand.
The new 2016 W900L’s can cost around a quarter of a million dollars, but they’re also listed down around $160,000 for more basic models without sleepers. To read more about this 2006 custom, click here.
3 Steps To Relieve Sciatica Pain In 2 Minutes

Dr. Mark Wiley of Lose The Back Pain explains three techniques sciatica-sufferers can do on themselves to ease their pain, and judging from the response I have seen to Wiley’s techniques, these work well for a lot of people. Additionally, if you are someone who has tried these techniques but still haven’t had much luck in relieving this pain, maybe getting in touch with a chiropractor in victoria (if you live in this area of Canada) or one local to you could be the answer you’ll need to help reduce these back pains and finally live comfortably. You don’t have to feel like dealing with these pains is normal. Although many people may suffer from pains, it doesn’t have to take over your whole life, especially if you may be able to find a solution. So regardless of whether you decide to try something like red dragon strain to manage the pain, exercise, meditation or taking up swimming, as long as you find a way that works for you, that’s what matters.
If you are experiencing this, or what to learn more, you might want to check out somewhere like https://stretchcoach.com/articles/sciatica/ for more information.
Dr. Mark Wiley’s Three Sciatica Pain Relief Moves
1. Let one arm hang straight down the side of your body. Point your fingers toward the middle of your thigh (for many people, this will just be where your hand hangs. Some may have to haunch over somewhat) and push a finger/three fingers into the muscle of your middle thight on the side of your body.
Rub there with the pressure of your finger/fingers in a rotating motion. Wiley says that this should make you feel some discomfort, but that discomfort should feel “like a good pain, not an injury pain” — like a release, like when you get a massage.
Rub this way for around 15 seconds or so.
2. Drop down on one knee. The other knee is bent so your thigh sticks out straight from your body. There is a bone on the side of your knee. Locate that bone, and right underneigh the crest of that bone there is another accupressure point. Use a thumb to press on that spot and rotate in a rubbing motion.
Rub this way for around 15 seconds or so.

3. Find a space between the bone on your foot that leads up to your small toe. Push a thumb into the space between that bone and the bone that leads up to the toe next to your small toe. Press in pretty good (but not injury hard), but this one doesn’t need rubbing.
Rub this way for around 15 seconds or so.
Repeat steps 2 and 3. Then stand up and do another 30 seconds of step 1.
Here are 3 simple exercises to relieve back pain & neck pain
After a tiring day at the office, nothing sounds better than a body massage. If we are experiencing a stiff neck, body and shoulder pain, one of the best ways to alleviate this is to seek a professional body massage. Lot’s of people have reported problems with their hands too. This is an area people often ignore, which shouldn’t be the case! You might want to go to handsurgeonsnyc.com if you have suffered a hand injury. However, it cannot be denied that there are instances that we are too busy with our professional life that we hardly have time to get treatment or even a professional massage. Furthermore, there are also times that we cannot afford to get one done by a professional. There are other ways in which you can relieve back pain. You might want to try pilates classes, as they are one of the most popular fitness programs in the world. You could try these three simple exercises to lessen the pain you feel, and you can do these simple techniques even in the comfort of your own home. Another tip that many people may not have thought about is switching their old office chair and desk for brand new office furniture. It may be tempting to go for the most expensive and coolest looking chair and desk, but when it comes to improving your health, you’ll need to find furniture that meets your requirements, which is to improve your posture and lessen the chances of back and neck pain. Hopefully, you’ll be pain free sooner than you think. Back pain can be hard to live with, but you’ll find an answer in no time.
First of the three techniques is massaging your neck. You just need to purchase a hard sponge, a yoga cube and a tennis ball. This technique is perfect if you are experiencing a stiff neck. Your hand will hold the yoga cube while the other will take the ball. Face the wall while standing one foot away from it and bringing your left leg back. This will be followed by holding the cube against the wall through your right shoulder. Consequently, the ball will be placed in between your neck’s curve and the cube. Last, push your body against the wall. Repeat the process for the right side of your neck.
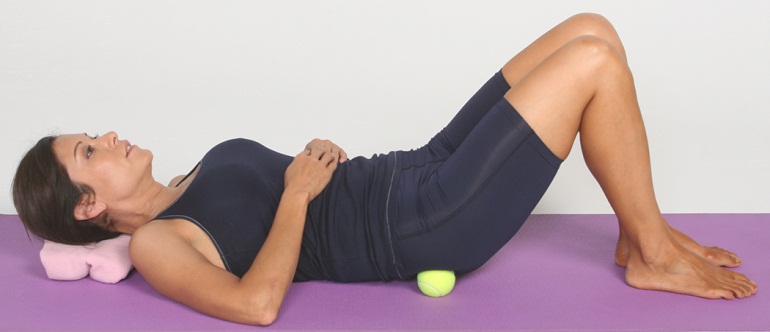
Second is massaging the upper part of your back. When you experience back pain, then neck pain will most likely follow. In that case, massaging your back is the most sensible course of action. While facing the wall, you can stand with your back against it. The area between your spine and the top of your shoulder is where you place the tennis ball. Then your body should be leaning into the wall. You can be assured of targeting your internal muscles by massaging it in a circular motion.
When you are exposed to computers and mobile phones the entire day, it cannot be denied that you will feel sudden back and neck pain. In that sense, stretching these parts of the body is necessary.
You can stretch your entire neck and body by placing your hands behind your back and lifting your head in a slow manner. Make sure that your stomach is relaxed while you are doing this. Do this for 20-30 seconds
These three simple exercises will help relieve the pain you feel in your body and neck. Make sure to remember all these and do it when your pain is hard to bear.
Here are 3 simple exercises to relieve back pain & neck pain 2
We learned about this neat piece of information here: http://www.nhs.uk/Conditions/Back-pain/Pages/Introduction.aspx
1920’s Cloche Hat Crochet Pattern

The 1920’s were generally a time of prosperity between the First World War and the Great Depression, and one of the most iconic style trends of the period involved jazz music, dances and flapper fashion. This crochet pattern is for a hat of that era — the Cloche — so will you crochet a cloche?
The pattern was created by Olivia over at Hopeful Honey (that’s her in the photo above).
For this DIY crochet project, you will need:
- crochet hook (6mm)
- yarn (12ply bulky yarn)
- scissors
- needle (tapestry / wool)
The pattern will make an adult sized hat.
The procedure starts with a slip knot and three chains. The pattern includes mostly half doubles and slips, and will eventually be 103 half double crochets.
Then the flower — the rosette — starts with a slip know as well and 49 chains. This part of the pattern uses singles and doubles as well.

The flower is formed by laying down a strip of crochet, which will form the petals, and sewing the flower together using another piece of yarn, then sewing it onto the hat and fastening off.
For the full pattern, visit Olivia at Hopeful Honey blog (click here).