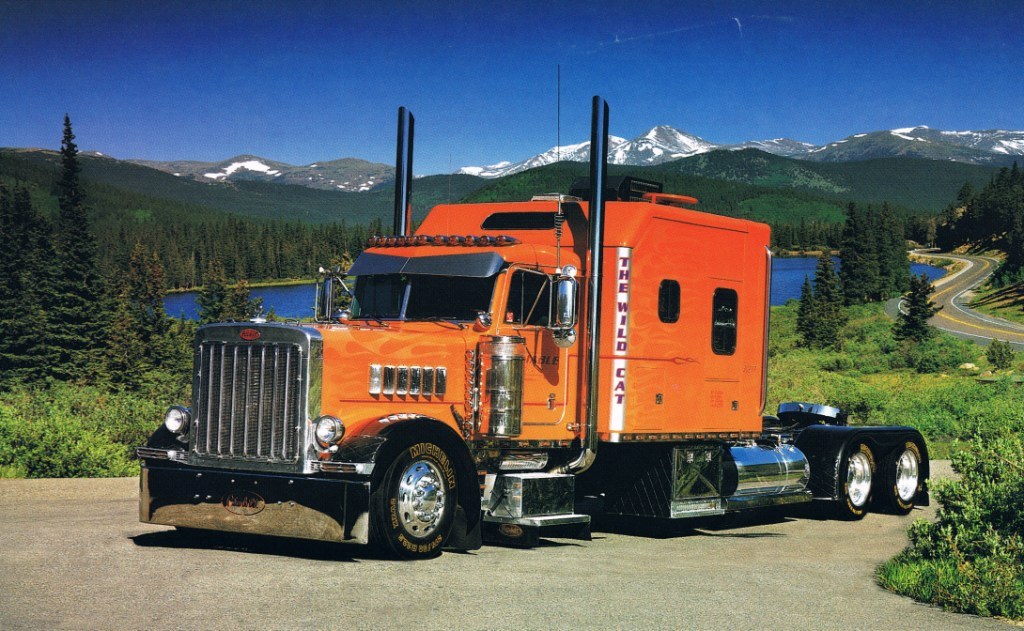
This is a custom Pete known as “the Wild Cat.” That’s what it’s owner called it. It was featured in a calendar for Shell Superigs in 2001. Remember it? It’s a Peterbilt 379.
We’ve written about a few orange custom semis. Orange seems to be a pretty divisive color when it comes to trucks. Some people are enthusiastic about it. Some aren’t at all. Orange is also a popular color for industry machines, like moving companies. It’s considered to be a safe color, because its so bright and people can see it. Even out of the corner of your eye, you notice when a giant bright orange shape is around.
Featured music of the day:
To subscribe to this musician, click the red button:
Not much is known about this truck, but its such a great photo in a nice setting I had to at least post it once. I’m hoping you guys will comment and lead me onto the trail to find out more about it, and I’ll update this piece of writing. Or maybe someone will know what happened to it. Also, we should know more about this truck! So this write up won’t be the most elaborate one we have here (yet!) but I’ll put a ton of specifics in the next one or two for you guys. I just like a good picture of a good truck.
Although custom, this looks like it could have been the guy’s daily runner. All the custom work seems at least functional. I think a lot of people seeing the truck will appreciate that. Dig that square chrome step. The amount of custom work seems pretty even over the whole truck, but is somewhat modest, and I think that makes a kind of nice, attractive but work-like look for this particular custom Pete.
Toy hauler modifications. You can do just about anything you can think of to a home on wheels or RV. This one got a patio put in.
These are called “toy hauler patio kits.” Because they usually get installed in so-called “toy haulers” — RV trailers used to tow around boats, quads, bikes, snowmobiles, what have you, from home to some outdoor recreation location. It’s more common to see the patios on the back of the RV unit — a common configuration is for the back wall square to fold down (attached still by guy cords or metal wire ropes– and a roof to be pulled straight out of the roof of the RV (in other words, its stored flat just under the roof of the RV, and gets pulled out sort of like a garage door.
The patios sometimes have fences around them as well, but not always, sometimes it’s just a flat floor that sticks out from the RV with some guywires. Not even fences around on some of them, just a nice spot to put some chairs or if you’re feeling luxurious, why not get something like an alexander rose range of garden furniture to put on the patio. They increase space, for one thing, anyway. There are lots of different items that you can purchase to decorate and enhance your patio, a High-quality Cantilever Umbrella will look amazing on your patio, offering you comfort and shade when the sun is blasting. Protecting your skin – how efficient!
Toy haulers are a lot like fifth wheels. And you can find them at around the same prices. Maybe 4-6 thousand for an ok one. Down to a couple thousand for a cheaper one. No limit of course to the top end.
And some of these toy haulers come with patio fold outs, or toy hauler patio kits (if they did the patio after buying).
Actually, there is some strong arguments on the side of buying one made with a patio. Mainly, its in the warranty. If you do your own patio, whether you do it yourself or have it done at a shop, its often not covered by your warranty (or voids part of the warranty).
However, on the other side, there is price. To buy one of these, it’s been reported it would cost around $2,300.
What some people do is just take their ramp and attach cables to it in the corners, so they drop the ramp, but its attached to cables to keep it from touching the ground. However, that’s a basic way. Something like this picture requires quite a bit of professional-level work. One company that does a great job of this all is Highland Ridge (pictured).
This is the semi limo of Jeff Botelho, a 2002 Peterbilt 379 four-door limousine big rig with a 360-inch wheelbase and a 15-foot long cab floor. The truck was built in 2010 and was featured on the show “American Trucker” in 2011, and won a prize at the Louisville, Kentucky Big Rig Build Off competion (but not a first prize). It’s called a “Cowboy Limousine” by the custom semi builders.
The rig also has a 2,000 horsepower Caterpillar C-16 engine (that was a C-15 before a rebuild).
As you can probably guess, this custom truck is not a daily runner for transporting anything. Except people, maybe. It’s done up with being a limo in mind.
The bumper pretty much smoothes out gravel if you’re off pavement.
Notable modifications:
– cut down 3 inches a Peterbilt Ultra roof cap for the front
– bright green paint on chassis, drive train and dash by PPG (a sponsor for the build off). The paint was also customized when Botelho brought it back to the paint show to adjust the color.
– Polished button-head bolts on frame
– Engine re-paint
– Custom upholstery by Castillo’s Upholstery in Modesto, CA
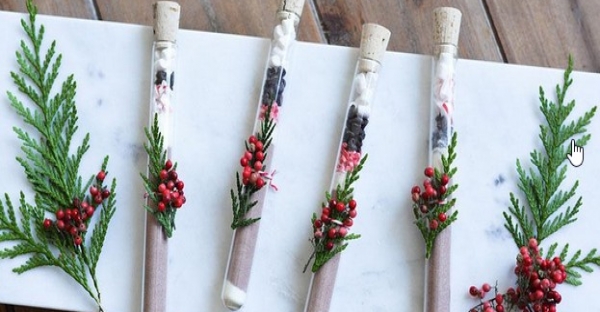
This is a simple little Christmas season holiday present or decoration (edible decoration) at home. It’s simple, so I’ll put the directions simply:
Materials:
– cocoa mix: 1 cup non-fat dry milk powder, 1 cup unsweetened cocoa powder, 1 cup powdered sugar
– jet-puffed mallow bits
– mini chocolate chips
– test tubes with cork topper
– candy canes
– small metal funnel
– spoon
– bowl
Optional:
– faux pine or holly leaves and faux holly berries
– sprinkles
– baker’s twine
Crush a few candy canes in a bowl.
Great New for Cat Lovers - Wet Felting
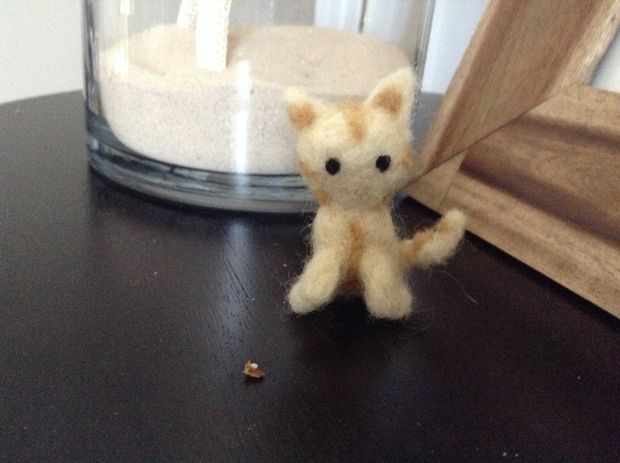
Great news for momo-lovers for it’s time for momo wet felt making. Creating a kitty with wet felt is absolutely awesome! Crafty minded will enjoy this and will really have fun! Definitely, it is adorable even for those who have no interest in cats!
Make use of a felting wool with two different colors. Orange color felting wool is for the main body and white color felting wool is for the stripes. Black is for the two cute kitty eyes, three textured needle and four sponge block. You can use a pillow for the sponge block.
Now it’s time to work for the kitty’s head. Loosely roll the orange color with your fingers. Never roll it tightly as it might not shape the cat’ head properly. Then stab it continuously until it is shaped like a ball.
For the body, stab over and over until the cat’s body is formed. The next part is the tail. This time you have to tightly roll with your fingers. Swirl it with your fingers to form a curve shape. This will create a cute kitten. Attach the rolled tail to the cat’s body.
Place the eyes and put a few whiskers to make it more realistic. Now, your cat is ready!
We learned about this neat information from Instructables. Visit Instructables
Make These Wet Felt Coasters
Felt making is a fun hobby for creative hands. You only need a few inexpensive materials. I am sure you have a sushi mat in your kitchen but it is better to get a separate one for your arts. Prepare merino wool top, a bar of Castile soap, soap shavings, tutu fabric, a plastic bottle container that has holes punched in the lid and some lukewarm water and 2 teaspoons of soap shavings.
1. Pull a tuft from the merino wool. Keep in mind that cutting the wool will result to a blunted edge which is not good for making a felt. Be gentle as possible when you pull off the tuft of the wool.
2. It is nice to use at least three different shades of the same color. Strong pink, moderate pink tint and light pink is a good blend of shades for your felt. This will create an interesting appearance unless you want a simpler one, make use of just one shade. To create three different shades, pull the tuft together and lay them one on top of the other. Then clutch the ends and gently pull them apart. Lay down the other two tufts and repeat the procedure until you get a beautiful blend of the shades.
3. Now, it’s time to spread the bubble wrap on your working surface and place out a few tufts of wool on the bubble wrap horizontally. Make use of thirty centimeters square of bubble wrap.
4. Then vertically lay additional tufts to cover the first layer.
5. The third one must be horizontally laid like the first one.
6. Place carefully a piece of fabric over the wool.
7. Sprinkle water on the wool over the net but make sure not to over wet it.
8. Now polish the wool using a spherical direction through the top of the net.
9. Peel back and then take away the net, freeing any stuck fibres. Lift it off the bubble wrap and place on top of the sushi mat.
10. Troll the sushi mat up compactly and drain off any extra water.
11. Carefully unfold the mat and turn the felt.
Roll the mat up and repeat the rolling process for about a minute.
Repeat steps 10 and 11. Check to see if the felt is already felted and check it by doing a pinch test. If you pinch it and you can still pull the layers apart then it means that it’s not yet ready.
12. To remove the soap, rinse it will lukewarm water. For the final rinsing, use cold water.
13. To create your desired shape, use cookie cutter. A round shape or a heart shape may do.
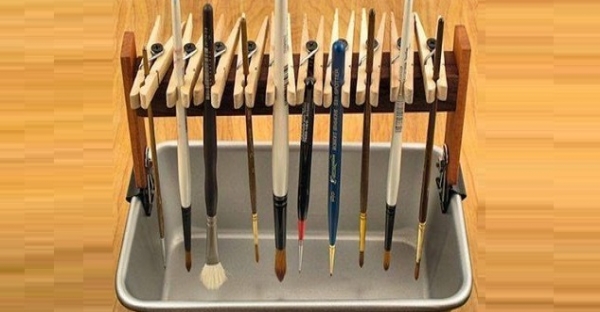
Paint brushes need cleaning–as all artists and crafters know. And the price of good brushes says we should clean them with care. Here’s a way to really get a good dry after cleaning them, and get more crafts out of your craft supplies.
As you can see, its held together by nails. You can use just about anything in the house, so long as you hang clothespins above a plastic bin.
Great New for Cat Lovers - Wet Felting
Great news for momo-lovers for it’s time for momo wet felt making. Creating a kitty with wet felt is absolutely awesome! Crafty minded will enjoy this and will really have fun! Definitely, it is adorable even for those who have no interest in cats!
Make use of a felting wool with two different colors. Orange color felting wool is for the main body and white color felting wool is for the stripes. Black is for the two cute kitty eyes, three textured needle and four sponge block. You can use a pillow for the sponge block.
Now it’s time to work for the kitty’s head. Loosely roll the orange color with your fingers. Never roll it tightly as it might not shape the cat’ head properly. Then stab it continuously until it is shaped like a ball.
For the body, stab over and over until the cat’s body is formed. The next part is the tail. This time you have to tightly roll with your fingers. Swirl it with your fingers to form a curve shape. This will create a cute kitten. Attach the rolled tail to the cat’s body.
Place the eyes and put a few whiskers to make it more realistic. Now, your cat is ready!
We learned about this neat information from Instructables. Visit Instructables
Make These Wet Felt Coasters
Felt making is a fun hobby for creative hands. You only need a few inexpensive materials. I am sure you have a sushi mat in your kitchen but it is better to get a separate one for your arts. Prepare merino wool top, a bar of Castile soap, soap shavings, tutu fabric, a plastic bottle container that has holes punched in the lid and some lukewarm water and 2 teaspoons of soap shavings.
1. Pull a tuft from the merino wool. Keep in mind that cutting the wool will result to a blunted edge which is not good for making a felt. Be gentle as possible when you pull off the tuft of the wool.
2. It is nice to use at least three different shades of the same color. Strong pink, moderate pink tint and light pink is a good blend of shades for your felt. This will create an interesting appearance unless you want a simpler one, make use of just one shade. To create three different shades, pull the tuft together and lay them one on top of the other. Then clutch the ends and gently pull them apart. Lay down the other two tufts and repeat the procedure until you get a beautiful blend of the shades.
3. Now, it’s time to spread the bubble wrap on your working surface and place out a few tufts of wool on the bubble wrap horizontally. Make use of thirty centimeters square of bubble wrap.
4. Then vertically lay additional tufts to cover the first layer.
5. The third one must be horizontally laid like the first one.
6. Place carefully a piece of fabric over the wool.
7. Sprinkle water on the wool over the net but make sure not to over wet it.
8. Now polish the wool using a spherical direction through the top of the net.
9. Peel back and then take away the net, freeing any stuck fibres. Lift it off the bubble wrap and place on top of the sushi mat.
10. Troll the sushi mat up compactly and drain off any extra water.
11. Carefully unfold the mat and turn the felt.
Roll the mat up and repeat the rolling process for about a minute.
Repeat steps 10 and 11. Check to see if the felt is already felted and check it by doing a pinch test. If you pinch it and you can still pull the layers apart then it means that it’s not yet ready.
12. To remove the soap, rinse it will lukewarm water. For the final rinsing, use cold water.
13. To create your desired shape, use cookie cutter. A round shape or a heart shape may do.
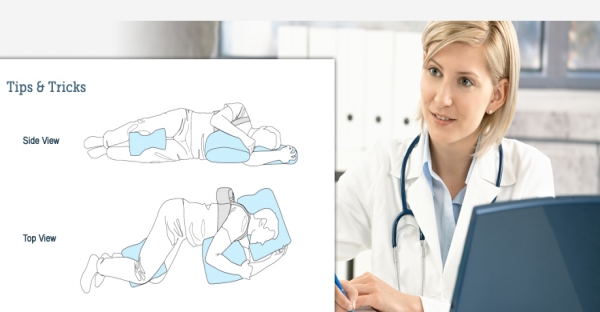
This is a bedtime tip for preventing sleep apnea–this one targets “positional snoring.”
The tennis ball trick:
This is one means of trying to prevent sleep apnea, which is becoming increasingly recognized as a condition reducing the quality of life (and performance) of our peoples. The number of sufferers has recently been found to be higher than before thought. Here’s the simple technique you could try, to keep you from laying on your back, a position associated with sleep apnea for some:
In order to keep yourself from rolling onto your back while you sleep, sew a tennis ball into a pocket on the back of your pajama top. Or wedge a pillow stuffed with tennis balls behind your back.
Our bodies definitely have a specific way of functioning, and there are certain elements needed for it to function healthy. I am always amazed at the articles that are written about Omega-3. I consider in some sense it to be on the level of requirement in our everyday lives. I am aware of the cardiovascular benefits by taking Omega-3, for it will help with lowering cholesterol and triglycerides. And it makes sense that Omega-3 would help with reducing joint pain from those who have Rheumatoid arthritis because it reduces inflammation.
Omega-3 helps those with mood swings, depression, poor memory, and circulation. The facts are the size of our brains is what makes the difference when it comes to poor memory. Studies are showing that as we age our brains start shrinking. An example of this is in Alzheimer’s the brain cell’s shrink and are replaced with dense spots know as plaque. Remember, when I said Omega-3 has cardiovascular benefits it works the same way in your brain. Omega-3 may halt or prevents the shrinkage in your brain.
The International Conference on Alzheimer’s disease was held in Paris. Dr. Loris Daiello presented at the conference a study consisting of 819 older adults. The data consisted of 117 men and women who took the fish oil regularly in comparison to 702 those who did not. After three years she gave a memory test to the 819 people. Her findings were the shrinkage of the brains was less in the 117 people than those who did not take Omega-3. Most people are unaware of how importance the meaning is; “You are what you eat.” Although every person’s bodies is not the same, there are elements that can assist everyone in living healthier. Of course before anyone decides to change their way of living it is always advisable to converse with a certified doctor.
By Linda Allen
Enzymes… Are They Important?
I can remember when I could eat almost anything without having indigestion. I do not remember changing anything to cause it. I only grew older…humbug.
So how does this all work? Most of us understand the concept of chewing food and salivary gland secreted together in order for the food to be broken down into smaller pieces. The saliva contains an enzyme called amylase; this enzyme moistens the food and helps it pass through the esophagus as well as split starch and sugars. This starts the connection between the process of chewing and swallowing the food.
There are quite a few enzymes which are needed in the digestive system, but there are three enzymes specifically function based on molecules that help digest foods. Enzymes are one of the processes in your body that for some people do not work as well as when they were younger. The Enzymes work by breaking down large insoluble molecules of food into smaller molecules so they are easily absorbed by the body. There are three molecules in most people’s body that function at certain parts of the body and they are as followed:
Protein molecules are composed of many different amino acids and the protease enzyme’s break down these molecules. The protease enzymes begin in the stomach by breaking down the protein molecules. Amylases enzyme breaks-down the starch molecules, which are made up from many glucose molecules called the carbohydrates, which starts the digestive process in the mouth. Our fat molecules consist of not only our fatty acids but the glycerol molecules and needs the enzyme lipase to break down the fat molecules.
Of course there are other important processes needed for digestion. Hydrochloric acid’s role in digestion is to rid of any bacteria remaining in the food. There are eight major digestive enzymes when it comes to digesting food. And each one of them has a specific role.
The recommended amount is usually cited as just under 2 liters water (8 1/2 c). We often hear about 1.9 liters–the 8 8-ounce glasses of water recommendation.
Factors the influence your water needs: exercise [you require more water, but it depends on how much exercise you do], environment [humidity means you sweat and need more water, and so can high altitudes], health/illness [diarrhea or vomiting means you need more water, maybe even rehydration solutions like Gatorade, Powerade and CeraLyte. Health conditions like bladder infections, urinary tract stones may mean you need more water, BUT heart failure, some types of kidney, liver and adrenal diseases, may impair excretion of water and even require that you limit your fluid intake]
… and PREGNANCY or BREASTFEEDING [you need additional fluids to stay hydrated–pregnant women require 10 cups or 2.3 liters and breastfeeding women need 13 cups or 3.1 liters, according to the Institute of Medicine recommends that pregnant women drink about 10 cups (2.3 liters) of fluids daily and women who breast-feed consume about 13 cups (3.1 liters ).
Water helps your body in several ways. Think about how not having water could hurt it:
– It helps dissolve mineral and nutrients so your body can use them.
– It helps prevent constipation
– It carries nutrients and oxygen to cells
– It flushes out waste products and makes the job performed by your kidneys easier
– It lubricates your joints
– It regulates your body temperature
– It moistens tissues (like your eyes, mouth and nose)
– It protects your organs and tissues
If you don’t really like drinking water, but want to try to drink more of it, here are a couple things you can try:
– Add lemon or lime to water to give it a little flavor.
– Put a glass beside you, and you might just start taking sips.
– Add ice cubes. Or add frozen fruit ice cubes.
What water NOT to drink a lot of: mineral water.
It has a salt (usually, not always). This will cause you to retain fluids.
Some people enjoy having colored light on all year round in their home, not just during the Christmas season. Do you know anyone who leaves multi-colored strings of lights on in their basement just because they like the ambiance? Their glow makes for a wonderful atmosphere that is enjoyed and admired by all.
If you happen to know someone that sounds like this, then this project might be for them! It also looks like a great decoration for a dinner party or a nighttime get together. It can also be very romantic if your partner also enjoys the lights as much as you do.
The materials and instructions are simple. You need 50 clear plastic cups, (not the red solo cup) some staples to hold them together, a drill to make holes, and a strong of Christmas lights to run through the holes to light the ball up. The lights can’t be the older kind; you need LEDs (also known as Light Emitting Diode) because they don’t melt the plastic and can also create a fire and or toxic fumes hazard.
This is how you are going to make it. You’re going to be very surprised at just how easy it is!
Drill a hole in the bottom of each plastic cup. Then, staple 12 cups together to form a circle. Then make a 9 cup circle above the 12 cup circle. You can use clothespins to support the cups while you staple them together. Then make a 4-cup circle at the top.
From the inside of the dome that you have just made, place the LED lights through the holes.
Make a second half-sphere the same way, fill it with LED lights the same way, and then staple the two halves together.
In conclusion, these sparkle cups are fun and easy to make, and in no time flat you’ll be the envy of your friends, who’ll also probably want to make their own lights!
 " >
" >